Sunday, April 26, 2015

How to Install Android 5.0 Lollipop CM 12 ROM on Android One- Micromax A1, Karbonn Sparkle V and Spice Dream Uno

A Few month back android announced a new operation system android One which main motto is to provide a better android experience for the people of countries like India. Android One first launch in India and there is only 3 company which provides Android One phone, they are Micromax, Spice, Karbonn. The devices that are running on Android One operating Systems are Micromax Canvas A1, Karbonn Sparkle V and Spice Dream Uno. All the Android One device is running on Android 4.4 KitKat operating system and has the ability to receive updates for Android 5.0 Lollipop.
These Android One phone will get official Update for Lollipop in coming future, but if you love custom ROM’s and don’t want to wait for the official update to experience the Lollipop then you are at right place. Here I will show you how you can install Android 5.0 Lollipop Cyanogenmod 12 ROM on your android one phone.How to Flash CMW custom recovery on Xiaomi Redmi 2
Install Android 5.0 Lollipop on Android One
We are going to install Lollipop on Android One device with the help of Cyanogenmod 12 ROM. So before moving to the guide on how we can install Android 5.0 Lollipop on Micromax Canvas A1, Spice Dream Uno and Karbonn Sparkle V let’s first check out what Cyanogenmod ROM is.

What is Cyanogenmod 12 ROM?

Cynogenmod is an open source android developer which creates and distributes Open Source firmware for Android based smartphone and tablets.
In simple word Cyanogenmod ROM’s include all the features that are available on Android’s original ROM with some additional feature. Some important features that can be available on Cyanogenmod are native theming support, FLAC audio codec support, a large Access Point Name list, an OpenVPN client, an enhanced reboot menuCPU Overclocking and many more.
Cyanogenmod 12 is the new ROM from Cyanogen which is based on very latest Android 5.0 lollipop OS. With this ROM you can taste the sweetness of Android 5.0 Lollipop. :)
Now I think you are very much clear about the Cyanogenmod 12 ROM. Now let’s jump to the tutorial to install Android 5.0 Lollipop on Android One phone (Micromax Canvas A1, Karbonn Sparkle V and Spice Dream Uno) with the help of Cyanogenmod 12 ROM.

Pre-Requisites

  • Your phone should be rooted before following the below guide. If not done already then follow this guide.
  • This process won’t delete your file, but to play in safe side, I will recommend you to create a backup of all your important data and settings.
  • Make sure that there is 80% or more charge on your phone.

How to Install Android 5.0 Lollipop on Android One Device Karbonn Sparkle V, Micromax Canvas A1, Spice Dream Uno

Follow the below instruction carefully to Install Android 5.0 Lollipop CM 12 ROM on Android One device.
  • First of all download the CM 12 ROM and save it somewhere on your PC.
  • Then Download Android 5.0 Google apps package and save it also on your PC.
  • Now connect your phone to the PC via USB cable and transfer the both files to your device’s internal storage and remember the location.
  • Now boot your phone to the Recovery Mode. To do so Press and hold the Volume Up button and Power button and then select “Recovery Mode” from the menu. You can also use the “Quick Boot” app to enter into recovery mode easily.
  • On the recover screen, select “Wipe” and then do a Swipe to Factory Reset.
  • Now again come back to the recovery screen. Here click on the Install buttonselect the path where you saved the CM 12 ROM, select that file and then swipe to confirm the Flash.
  • After flashing the CM 12 ROM, flash the Google Apps Package by following the same process.
  • Once done, come back to the recovery screen. Here choose Reboot> Select System to reboot your phone. (The first boot may take some time, so don’t panic)
  • Once reboot your phone, you will able to see that your phone is running on Android 5.0 Lollipop :)
Conclusion
So this was the tutorial on how to install Android 5.0 Lollipop CM 12 ROM on Android device. By following the above guide you can install Android 5.0 Lollipop on all Android devices including Micromax Canvas A1, Spice Dream Uno, Karbonn Sparkle V.
If you have any doubt or facing any error then let me know in your comments. Liked this post? Then share this post on social media with your friends and family.

How to Get Alexa Ranking Under 100,000 in Less than A Month

Alexa Rank is the most over rated term these days.After Google Page Rank the figure that is given high importance is the Alexa Rank.Day by Day Google Page Rank is loosing its popularity and it is taken up by Domains Authority and Alexa Ranking.
I already gave you 10 best tips to boost your Alexa Rank but in this article I will reveal some key methods using which you can get your alexa below 100,000 in less than a month.
If you are willing to get your alexa below 100,000 then you should know how alexa rank basically works.Do read my article on How Alexa Ranking works for a details info.
  • If you are aware of how alexa ranking works then its clear that you need traffic from bloggers and web masters to boost your alexa rank super fast.Because they are the people who will be installing alexa widget on their blogs.

Some Killer Tips to Get Alexa Below 100,000 in less than a Month:

Get Traffic from Bloggers and Webmasters.This is the point I am stressing from the beginning of the article but this is the only thing that helps you in boosting alexa rank super fast.The below are some methods to drive traffic targeted traffic to your blog which can boost alexa rank.

Write on Blogging ,SEO and Internet Marketing:

If you observe something blogs related to Internet Marketing have an awesome alexa even though they have less traffic.The reason is pretty much simple and straight forward i.e traffic from bloggers.So if you write articles related to Blogging ,SEO and Internet Marketing then you will get good traffic from bloggers thereby boosting alexa.

Participate in Discussion on Social Media:

These days everyone is on social media especially bloggers and web masters.When coming to social media the best networks I recommend to boost alexa are Facebook , Google Plus ,Triberr etc.
  • Facebook:The best social networking site today.Almost everyone is on Facebook Today especially Bloggers.Facebook is not only place to chit chat with friends but its a place to share and gain knowledge if you use it properly.Previously people used to live a life in the real world.But now people are living a life on Internet i.e on Facebook.Now all you have to do is join groups on Facebook related to Blogging,Internet Marketing and SEO.Then participate in discussions.Don’t spam the groups because the admins are very strict and will ban you permanently.When you participate in active discussion you can give one of your blog posts as reference to solve the issue of the people.In this way you can drive targeted traffic which will boost alexa rank super fast.
I am part of many Internet Marketing groups and very active on Facebook and Google Plus.Be active on these social media sites if you are not.
  • Google Plus:Not many people are active on Google Plus but the best thing about Google Plus is that most of the webmasters and bloggers are active over there.So you can take advantage of it.Join Communities that are related to Internet Marketing and promote your content.Don’t forget to use Hash Tag while sharing content on Google Plus.You can read more about How to Get Traffic From Google Plus
  • Triberr :I haven’t used this network much but I heard a lot of reviews regarding this social network where we can connect with like minded to people and form a tribe.This tribe will help your content get more shares on social media.To know more about Triberr you can check the article written by one of my friends explaining how he reached 250k+ people using triberr in less than a month.

Write Reviews about Alexa:

After reading this point I am sure many of the people will rush to your blog to write articles related to alexa and how to improve alexa ranking.
Yes go ahead and write articles related to Alexa. Because people who search for alexa should already have installed alexa toolbar on their browser so those visits will supercharge your ranking.You will notice an abnormal increase in alexa rank once you write posts about alexa.

Take Active Participation in Forums: 

Not all forums can help you in boosting alexa.Only few specific forums that are related to Internet Marketing Niche can help you.Some of the examples of such forums include Warrior Forums ,Digital Point Forum ,Black Hat World etc.Take active participation in forum and link back to your blog in signature.

Comment on Comment Luv Enabled Blogs:

This comment luv is enabled on only few blogs that too blogs belonging to internet marketing niche.So if you are the first to comment on posts of those blogs with comment luv then you will get 20% of traffic back to your blog who visits those posts.So highly targeted free traffic.

Use Fake Methods:

Now I wont be writing much about the fake methods here as I have already wrote a article on Step by Step Guide to Boost Alexa Rank with Fake Methods.

In a Nutshell:

  • Do whatever you can in such a way that you get traffic from bloggers and webmasters.Only such traffic can boost your alexa ranking super fast.

Conclusion:

If you follow the above what all I mentioned then trust me your alexa will get even below 50,000 in less than a month.If you want to add anything feel free to share in your commments.
  • Do check out some more methods to Improve your Alexa Ranking.
- See more at: http://www.alltechbuzz.net/how-to-get-alexa-ranking-under-100000-in-less-than-a-month/#sthash.y8fEYt4B.dpuf

How To Sign Out From Google Play Store in Android Phone Or Tablet

Almost everyone uses android now and you will feel this post is so simple but some people actually have issues on how to sign out from Google play store , I was going through some question sites and I actually saw some question been asked on how to log out or even sign out from play store. As you know, the Google Play store is very important because that the place to get your android apps easily all in one place which is far better.
How to sign out of Google play StoreSo, do you have a this problem? one of the main reason of this problem is because you want to sign in to Google Play Store with another Google account not the current one that is logged in, so how do you solve this problem? it quiet simple, you just need to log out from Google play Store from the old account and sign in with the new one.
Google store does not have a log out option, have checked.. and if you feel am wrong be my guest by checking it out yourself and log out, everything is associated in Google, which makes it different, It syncs one Google account with all Google Products available such as Youtube, Gmail, Maps, Search, Calendar, Drive and Google+ all works together in one account, you can not have different accounts in one android device except you log out and log in the new device or use you android browsers to log in to the Google products you like but not Google Play store, Because the Google play store will automatically redirect you to your phone play app.
So, how do one successfully log out of Google play store? let go straight to the point. There are two known ways which I explain well in this post including screenshot I got from My Samsung Galaxy S4 just for you to understand it well.

How To Sign Out Of Google Play Store From The Default Settings

Every Android device have been across has a setting where you insert your Google account, for the account to sync with all Google products on your android device, it is from these setting we disassociate the account from the Google products and put another one. This is where we need or can log out of Google play store because as you know its one of Google products. So it easy.
So how do you do this from your Settings?

Step 1

From your android device menu click on the “Settings”

Step 2

Click on “Accounts” and you will find list of accounts you have on your android device, just like you see in my screenshot below, then since you know we are after Google account, click on Google like indicted in the image.

Accounts on my android deviceStep 3

After clicking on the Google, you will find the Google addresses that is connected to all your Google products, must times you can have two email address on your android device but only one is connected to all your Google Products. My Android device shows that I have two email account synced but the one in use is the .gmail.com address account.

how to log out of google play storeStep 4

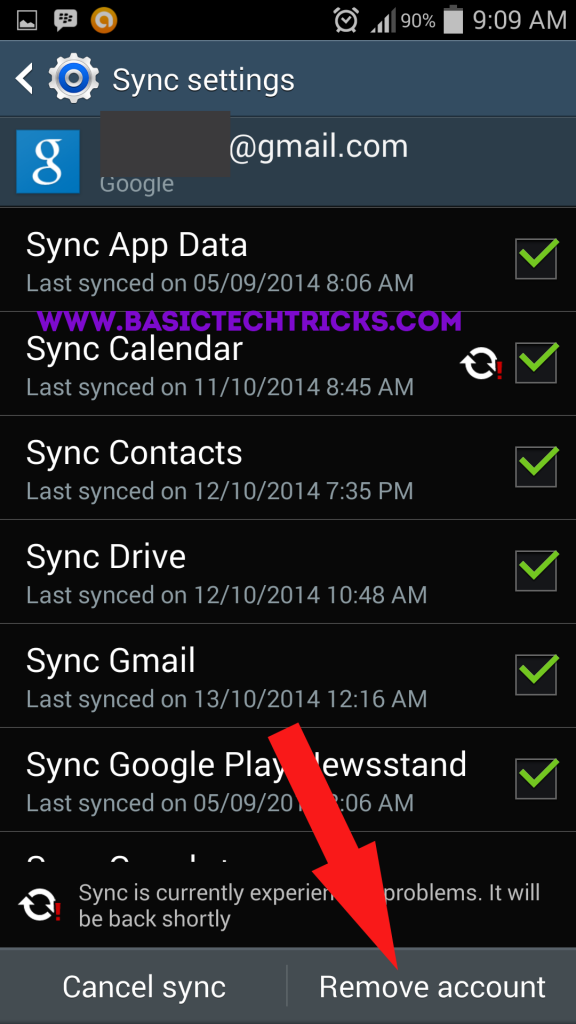
You have to remove the active account for you to be able to sign out from the Google play Store and also other Google products available, so to remove the account, tap on the email address that is active and it will show you all synced services and you will find a remove option below just like the image below.
how to remove a google accountWhen you remove it, you have successfully signed out from the Google Play Store, so you see it that easy, so if you want to sign in with a new account, you can just simply add a new Google account from that same Settings Accounts & Sync.

How To Log Out Of Google Play Store Using Log Out App

A app was created in logging out all accounts from your android device, its was not specially made for this purpose or problem but the app solves the problem at hand and I personally find it useful. it can be found and downloaded in Google Play Store
The App logs out all the account on the android device just with a click of a button which is cool, so there is not need to go settings and all that above method, but when you click on the Log out Button on the app, The App logs out all the logged in account even non Google products such a Twitter, Facebook and so on, so I strongly suggest you have all your passwords when using this app.
log out app to sign out of google play store
This method is fast but its not specified that the problem, it helps in logging out or sign out of Google play Store. which is what we are after.
Finally, those are the two methods that does the magic on how to sign out of Google Play Store on a Android device and also included a small tip which is how to sign in to Google play Store with another account.
I hope I helped in finding a solution for you problem, these method is very simple and has been tried and works. So if you looking for how to log out of Google play store and other Google products on android, this post is the solution. Please share to others

How To Root Innjoo F2 Tablet Easily

A Lot of Innjoo F2 Users have been complaining on how to root innjoo F2 device and how some software which are for rooting don’t work for it so I decided to go and look for a solution and during my cause of my research I found out a user in Nairaland actually testified of rooting his Innjoo F2 tablet using a software called VRoot.
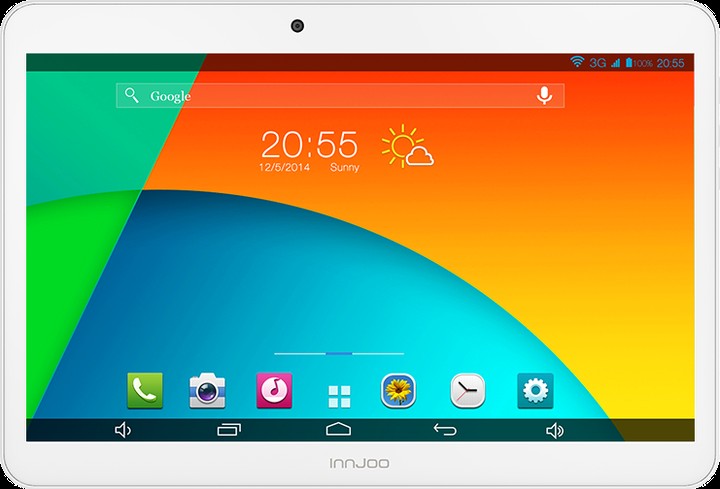
how to root innjoo F2 tablet easilySo in this post, am going to explain to you how to root Innjoo F2 device using this software and will also provide a link to where to download the software for your computer because its a computer based software, so you must have or provide one before you can be able to proceed. I will say you have a computer with you presently so lets proceed.

Steps On How to Root Innjoo F2 Easily Using vRoot Software

First, before you proceed, you must have downloaded vRoot software to your computer and install it on your computer but before downloading there are certain requirement that needs to be met. Such as;
  • A Computer running on Windows Operating System
  • USB cable to connect PC and the android device.
  • Install USB drivers. No need Clock Work Mode (CWM)
  • Charge your phone battery at least 50% before proceed.

Download vRoot Here

Please while trying to root your Innjoo F2 Tablet, please make sure your follow the instructions in below, please read the step by step instructions so that you can be able to root your innjoo F2 device well.
  1. Step 1 – Recommended: Backup all the data on your device before start the vRoot process.
  2. Step 2 – Download the android vRoot using above link and install.
  3. Step 3 – You have to be Enable debugging on your android device.(Settings–>Developer options–>USB debugging)
  4. Step 4 – Open the VRoot software on your computer that you have installed on your computer
  5. Step 5 – Connect the PC and the android device.
  6. Step 6 – Once you connect the Innjoo F2 device and computer it will automatically detect your smart phone or Tablet.
  7. Step 7 – Then click the “Root” button to start the rooting process.
  8. Step 8 – Device will reboot automatically and confirm by the Vroot software
I hope you were able to root your Innjoo F2 device with this method and software, please you can simply use the share buttons and share this post to your friends as this may help them, also like us on facebook, Twitter and get more cool tips and tricks from basicTechTricks. I hope your enjoyed How to Root Innjoo F2 Guide.

How To Enable And Disable Safe Mode In Samsung Galaxy S6

Samsung Galaxy S6 or Galaxy S6 Edge which are one of the flagship devices of Samsung at the moment,How to enable and disable safe mode on Samsung Galaxy S6 or S6 Edge. As you know I always give tutorials on Safe mode of different devices especially Samsung devices. So I will show you how to enable Safe Mode on your Samsung Galaxy S6 and also How to disable Safe mode on your Samsung Galaxy S6.
samsung Galaxy S6
Safe Mode is a feature in Smartphones especially Samsung devices where you can especially get into and remove buggy application which you have been find difficult to uninstall. this is the zone that you can troubleshoot problem and it will be solved not affecting any other part or memory files of the phone that why it is called safe mode and for Samsung Galaxy S6 Users the safe mode is available for the device.

First, Here Are Other Samsung Galaxy Phones Safe Mode Tutorials

How To Enable SAFE MODE In Samsung Galaxy S6 Device Easily

So now you know what you need to know about Safe Mode, so if you want to enable safe mode on your Samsung Galaxy S6 I will show you how to do it easily and quickly, all you have to do is follow the procedures below carefully and you should successfully enable safe mode at the end of this process on your device.

Step 1

On your Samsung Galaxy S6 phone, switch it off

Step 2

Switch your Samsung Galaxy S6 back ON

Step 3

while the phone is booting, press down the “VOLUME DOWN” button, continue pressing until it finish booting

Step 4

You find the safe mode writing below the screen at the left hand angle of the screen

How To Disable SAFE MODE On Samsung Galaxy S6 Easily

Yes, I know this will your next question, once you are in safe mode how do you exit it? that quiet easy but there are different ways to do this but it just depends on your stubborn and different your Samsung Galaxy S6 can be.
One of the simple and easy methods is that
  1. You will restart your phone and it will return back to the Normal Mode
  2. You will remove your Battery and put it back after 5 minutes and it will be okay
  3. Or you can go to the recovery mode if the above methods don’t work for you

And that it!!! so just pick one that will work for you out of the method above and you should be out of Safe Mode and back to your normal zone, so that how to enable and disable Safe Mode in Samsung Galaxy S6 devices.

How To Unlock A Android Phone Password Or Pattern Lock Easily

Android is a very interesting and very interface and it has become very popularamong mobile and gadget users been the operating system use now. The problem users face now is how to disable or unlock android phone password or pattern lock which has become common now.
diasble pattern lock for androidNo one is prefect so you meant have forgotten your android password or even pattern you used for the pattern lock, in this post, i will discuss about how you can unlock the android device that is already lock easily with some few easy tips, all you just have to do is to follow instructions and Bam!!! you are done.
unlock password lock on androidI try to make my tutorials easy and for readers to easily understand what am writing but if you have a problem, you can easily use the comment box and i will get to you as soon as possible :) 

Steps On How to Unlock Android Pattern Lock Or Password

To get your pattern lock or password of your android device unlocked please follow the instructions well and am sure you will get what you are going to get your device unlocked without problem.
  1. First you will switch of your Android device.
  2. After switching of your android device, press your up volume button and Press It down.
  3. Now press the power button and hold it too along with the volume up button.
  4. It will start a secret terminal interface.
  5. Then press to use home button for scroll up and down.
  6. Then you will get to the choose option DELETE ALL USER DATA.
  7. Select the option and wait
  8. Your device will take some time but after it will restart and you will find out your android device has been unlocked.
By following these instructions above you will successfully unlock your android device.

How To Fix Internet Download Manager Mozilla Firefox Integration Error

When it comes to download manager; Internet Download Manager is one of the best you can ever have with it unique and great features. Currently I formatted my computer and i wanted to reinstall Internet download manager back which I did but I could not download videos from YouTube and other files with IDM due to IDM integration problem with Mozilla Firefox Browser.
firefox idm problemNormally, You know that internet download brings out a pop up that sticks to your browser which you can click and download but the pop up download button don’t show on my Mozilla Firefox and also other browsers. Then I started my research and I notice that the extension that comes with my Internet download manager is not compatible with my updated browser.
Idm sticky download button
And since the Extension is not compatible with the browser I need update it and since the extension is not available in Mozilla plugin store so you need to download it and install the extension which I will show you where to download it and how to install it because doubling clicking it won’t install it.

Where To Download And Install Internet Download Manager Updated  Extension On Mozilla Firefox

Now first before you start you need to find out if the IDM extension is not compatible with your firefox browser, to know this is quiet easy.
firefox_menu

To locate your Mozilla browser extensions; Follow these steps

  1. Open your Mozilla Browser
  2. Click on the Tools tab
  3. On the Drop down menu click on the Add-ons
  4. Then Locate Extension in the new window that will pop up
Once you are there it will list out all the Extensions you have installed in your firefox browser, then locate IDM CC and you will see that the extension is not compatible and you can not update it from that tab so you need to download it.
To download the updated IDM CC extension Click Here to download it.
After downloading it, go back to the Add-on tabs that open showing your browsers extension then click on the Gear icon at the top right corner of the browser.
how to install extension from file
After clicking on the gear button, a drop down menu will show, click on the Install Add-on from file then locate the downloaded extension and install it.
install idm extension on mozilla
You will get a confirmation that your extension have been installed successfully, so you just restart your browser and you are done.
So I hope you understand the post here on how to solve the internet download manager firefox integration problem and also how to install extension from file. Thanks for reading please kindly subscribe below to get updated with tips like this.